No Bake Oreo Cheesecake Sushi – Better Than Takeout
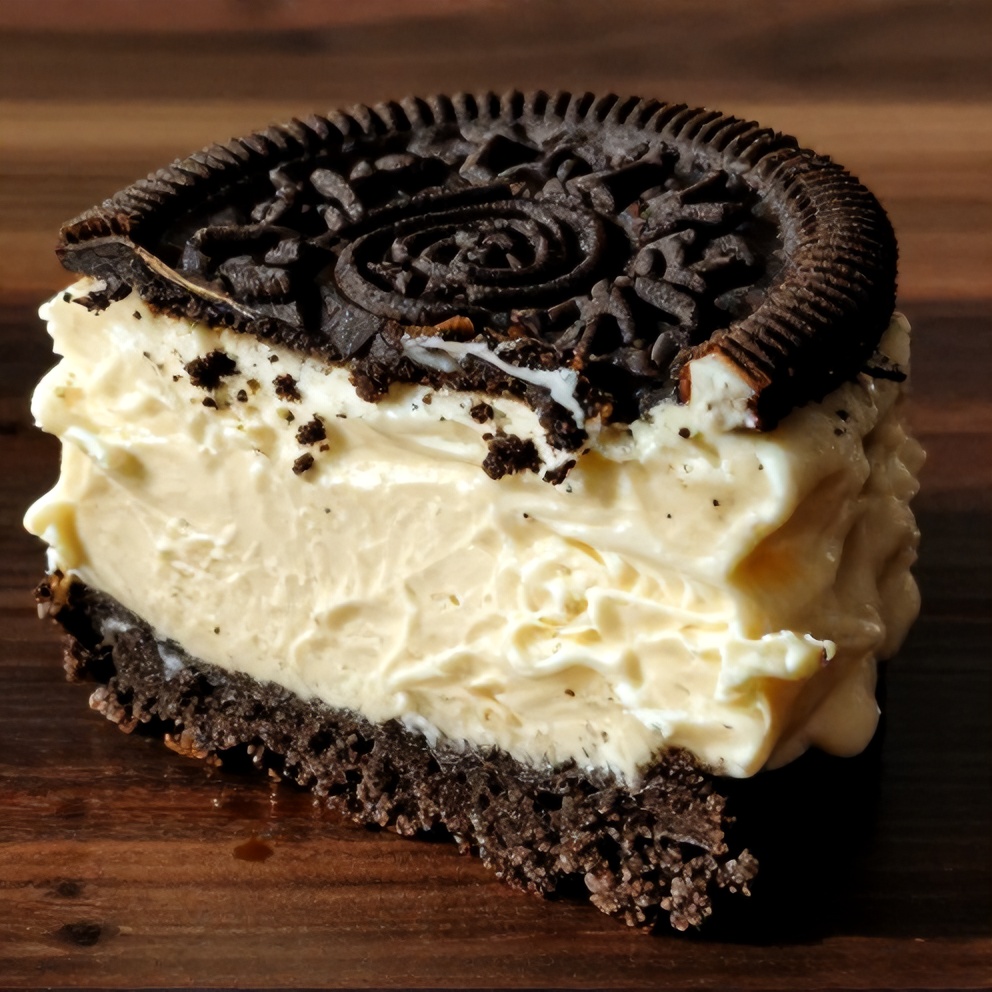
Make the best No Bake Oreo Cheesecake Sushi at home with this easy recipe. After making it dozens of times, I promise you’ll never buy store-bought again. The creamy cheesecake filling and crispy Oreo crust will make your taste buds dance. Keep reading for my best tips. If you love recipes like this, you’ll also enjoy Easy Green Bean Potato Salad with Balsamic Dressing and Banana Caramel Cream Dessert Recipe.
Why This No Bake Oreo Cheesecake Sushi – Better Than Takeout Is Pure Comfort
- Creamy cheesecake filling wrapped in crispy Oreo crust
- No oven required – perfect for summer or busy weeknights
- Impress your guests with this fun and unique dessert
- Easy to customize with your favorite toppings
What You'll Need for No Bake Oreo Cheesecake Sushi – Better Than Takeout
Choosing the right ingredients makes a big difference, but this recipe is forgiving enough to work with what you have.
- Oreos
- Cream cheese
- Powdered sugar
- Whipped cream
- Vanilla extract
- Salt
- Vanilla extract
- Optional: Fresh berries
- Optional: Chocolate syrup
- Optional: Crushed nuts
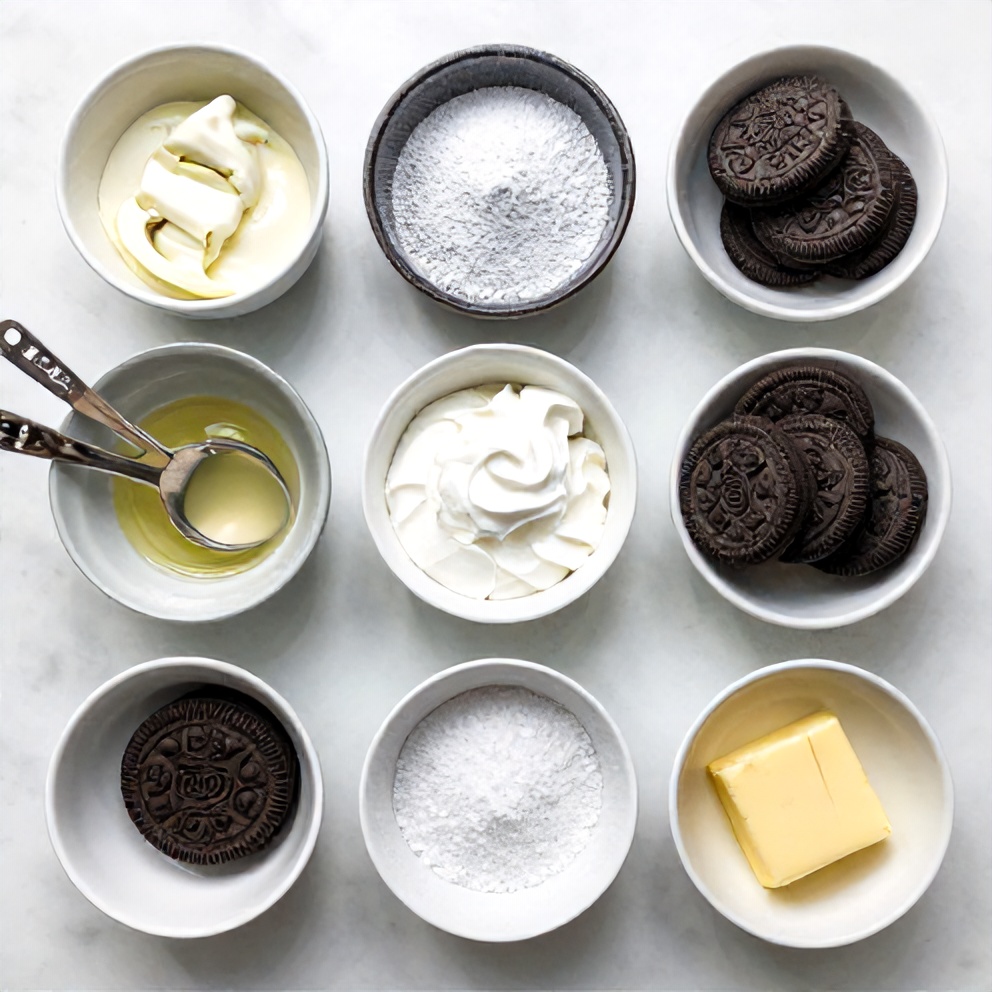
📝 Ingredient Notes
- Cream cheese: Ensure it's at room temperature for easy mixing.
🛒 Tools & Equipment I Recommend
- Food processor — Ensures even Oreo crumbs for the crust → See on Amazon
- Stand mixer — Makes light work of whipping cream and mixing cheesecake filling → See on Amazon
How to Make No Bake Oreo Cheesecake Sushi – Better Than Takeout
- Prepare Oreo crust: Pulse Oreos in a food processor until fine crumbs form. Mix with melted butter and press into a lined baking dish. Chill while preparing filling.
- Make cheesecake filling: Beat cream cheese, powdered sugar, and vanilla until smooth. Fold in whipped cream.
- Assemble sushi rolls: Spread filling onto chilled Oreo crust, then roll tightly using a bamboo mat. Chill for at least 2 hours before slicing.
Cook's Tips for Perfect No Bake Oreo Cheesecake Sushi – Better Than Takeout
- Common mistake and fix: If your cheesecake filling is too thick, add a tablespoon of milk or cream to reach desired consistency.
- Pro tip: For cleaner slices, use a sharp knife dipped in hot water.
- Pro tip: Make ahead and freeze for up to 2 months. Thaw in the fridge overnight before serving.
Storing & Reheating No Bake Oreo Cheesecake Sushi – Better Than Takeout
Short-Term Storage
Store in an airtight container in the fridge. Store in an airtight container in the fridge for up to 5 days Make-ahead tip: Prepare up to 2 days ahead and store in the fridge
Freezing No Bake Oreo Cheesecake Sushi – Better Than Takeout
Freeze for up to 2 months. Thaw in the fridge overnight before serving
Recipe Notes
- Chef tip: For a lighter version, use reduced-fat cream cheese and whipped topping.
- Best substitution: Replace Oreos with graham crackers for a different twist.
- Make-ahead: Prepare sushi rolls up to 2 days ahead and store in the fridge.
- Scaling: This recipe can be easily doubled or halved to suit your needs.
- Troubleshooting: If your cheesecake filling is too soft, chill it in the freezer for 15-20 minutes before rolling.
Want to level up this recipe?
Bamboo sushi mat — Makes rolling No Bake Oreo Cheesecake Sushi easy and fun → Check price on Amazon
No Bake Oreo Cheesecake Sushi – Better Than Takeout
Ingredients
Main Ingredients
- Oreos
- Cream cheese
- Powdered sugar
- Whipped cream
- Vanilla extract
Seasonings
- Salt
- Vanilla extract
Optional Toppings
- Fresh berries
- Chocolate syrup
- Crushed nuts
Instructions
- Prepare Oreo crust: Pulse Oreos in a food processor until fine crumbs form. Mix with melted butter and press into a lined baking dish. Chill while preparing filling.
- Make cheesecake filling: Beat cream cheese, powdered sugar, and vanilla until smooth. Fold in whipped cream.
- Assemble sushi rolls: Spread filling onto chilled Oreo crust, then roll tightly using a bamboo mat. Chill for at least 2 hours before slicing.
Notes
- Chef tip: For a lighter version, use reduced-fat cream cheese and whipped topping.
- Best substitution: Replace Oreos with graham crackers for a different twist.
- Make-ahead: Prepare sushi rolls up to 2 days ahead and store in the fridge.
- Scaling: This recipe can be easily doubled or halved to suit your needs.
- Troubleshooting: If your cheesecake filling is too soft, chill it in the freezer for 15-20 minutes before rolling.
Storage
- Fridge: Store in an airtight container in the fridge for up to 5 days
- Freezer: Freeze for up to 2 months. Thaw in the fridge overnight before serving
- Make ahead: Prepare up to 2 days ahead and store in the fridge
Nutrition Per Serving
- Calories: 420
- Protein: 5g
- Fat: 24g
- Carbs: 50g
- Fiber: 1g
- Sugar: 32g
- Sodium: 280mg
- Cholesterol: 75mg
- Sat. Fat: 14g
Nutritional values are estimates only. Actual values may vary by brand and portion size.
No Bake Oreo Cheesecake Sushi – Better Than Takeout FAQs
Yes, prepare up to 2 days ahead and store in the fridge.
Ensure your cream cheese is at room temperature and add a tablespoon of milk or cream to the filling if it's too thick.
Yes, freeze for up to 2 months. Thaw in the fridge overnight before serving.
No, this recipe does not require cooking and is best made no-bake.
Graham crackers can be used as a substitute for the Oreo crust.
A Warm Final Note
I can’t wait for you to try No Bake Oreo Cheesecake Sushi – Better Than Takeout and see how effortlessly it comes together. When you make it, pop back here and leave a rating or share how it turned out — I love hearing from you!